We can make distance learning more engaging for learners. I know this is true because I’ve been engaging hundreds of students simultaneously in distance learning, and I’m going to tell you all of my secrets.
The key to engaging students in distance learning is energy. You know how they say the camera adds ten pounds? It also cuts your energy in half. Just like an actor on stage, you need to bring big energy to distance learning. This is true for video, but it’s true for digital distance learning as well.
Let me show you how I bring big energy, the tools and tech I use, how I have students begging to have class on the weekend (!), and how you can do it, too.
Engaging Students in Online Instruction
I’ve got six specific tips for how I keep students engaged in distance learning that you can implement yourself before I share the tech and other ideas.
1. Energy
First, as I said before, you’ve got to up the energy.
There’s no way around it, and there’s no substitute for it.
You have to bring the energy.
So if you get to schedule a time for it, schedule a time that works for you.
If you’re recording, record when your energy is highest, even if it’s 2am.
If you don’t get to choose the time, make sure you’ve had a snack!
Think about how much energy you need for face-to-face and double it. It may feel a little over-the-top to you, but it works.
2. Use an avatar when you’re recording
If you are recording and can’t see your students, put something in front of you that you can pretend is a person – a stuffed animal, a picture of your favorite student (not that you have one) and speak to that.
Otherwise, it feels like you’re speaking to the great void of voids. It’s very difficult to do that, so you need to fake yourself out. A picture can help.
Once you get used to it, you won’t need this anymore, but it’s a great technique to get you used to speaking to a camera as if it were a real person.
3. Ask questions. Ask a lot of good questions.
Ask questions every five – seven minutes, more if the kids are younger.
And ask really good questions.
Teachers, the questions are where it’s at.
When Ian Byrd and I wrote our Depth and Complexity book, we spend hours upon hours on developing great questions and analyzing them for how strong they were.
Ask a lot of questions, and make them questions that get students thinking. This is important because of reason number one above – distance learning sucks energy, and it sucks energy out of the questions, too.
A question that would work fine in a classroom can fall flat in a distance learning environment.
You can make small adjustments to questions that quickly raise the engagement level.
For example, instead of asking, “Why do you think this character did this?”, you could ask, “Would you be more mad if your friend did that or your teacher did that?” or even, “When have you done something like this character did, but it turned out very differently?”
4. Stand up.
Have students stand up as often as you can. Even in digital learning, include it in the directions.
Of course this is especially true for younger students, but it’s true of our older students, too. We need to not be sitting for long periods of time.
You can build this right into the content.
“Stand up if you think the answer is an even number.”
“Stand up if you think the character should have chosen x instead.”
“Stand up if you think an escarpment is very similar to a mesa.”
You get the idea.
I use a practice cube that I toss to get kids moving. I can toss it right in my kitchen or office or wherever I’m streaming or recording from, and the students can respond.
I’ve written all about the practice cube (and included a printable), so you can read more about that if you’re interested.
5. Use props and puppets.
I use loads and loads of props. I gather them on sale, and over time I’ve accumulated a wide array.
I laid a bunch of them out on my kitchen table so you could see them.
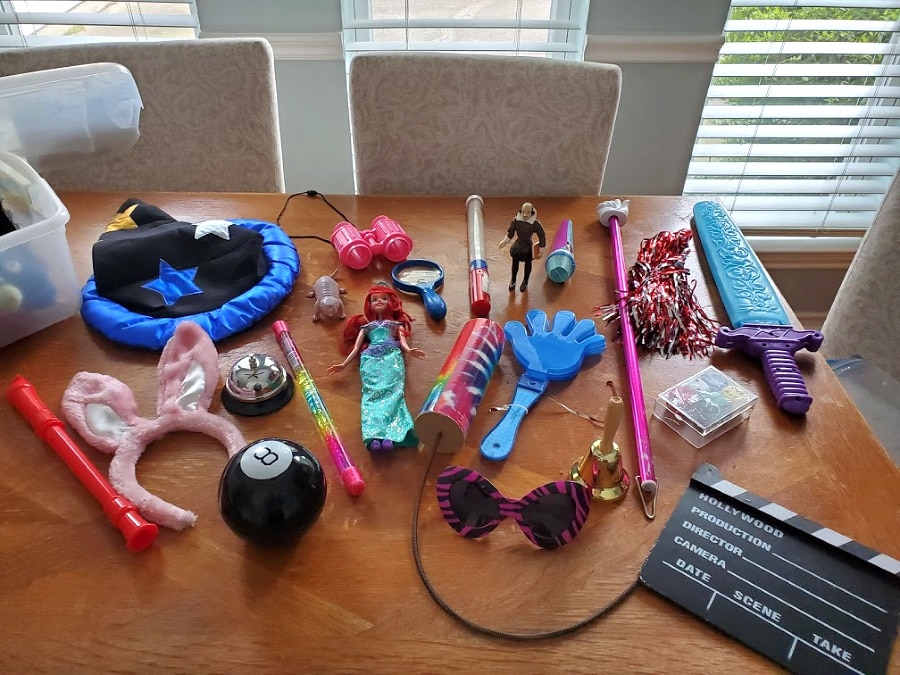
You can see:
- my wizard hat for when I’m doing something amazing
- a couple of bells for timers/getting attention
- a thunder tube for when I need a thunder sound effect (as you do)
- a plastic bubble sword for acting out epic battles
- a pair of silly sun glasses for when I need to look really cool
- a set of pretty large dice that I roll to choose numbers of things (how many problems we’ll solve, how many answers I’ll take, etc.)
- a Magic 8 ball that I use to give answers when I don’t want to
- fake binoculars and magnifying glasses for looking at things more closely
- pom poms for celebrating students’ terrific thinking
- a fake light saber for when I need the force to be with me
- a rubber naked mole rat that is my class mascot (his name is Chip)
- a Frozen toy microphone that sings Let it Go for when I need students to just let it go, already
- a toy Ariel doll that is our muse (we call her Calliope, who is the muse of epic poetry)
- a Shakespeare action figure for when we need help wordsmithing
- a glitter baton I use as a timer
And a few more!
I use loads and loads of puppets, too. I buy only Folkmanis puppets because they are so well made, are easily manipulated, and my students adore them. They’re simply the best.
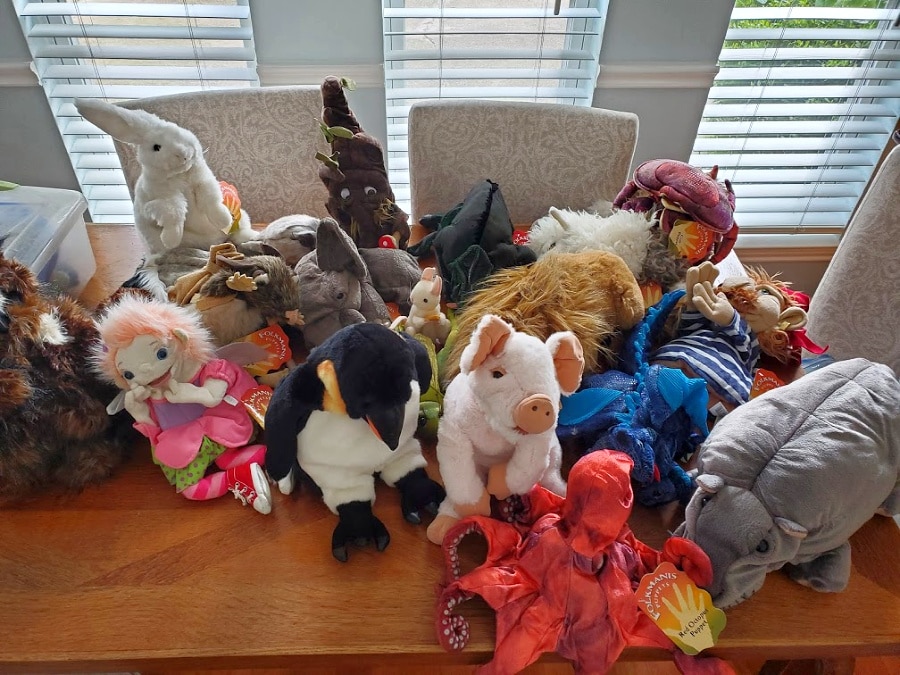
In this pile o’ puppets, you can see a few of my students’ favorites, including the three-headed dragon, the story telling tree (in the back), and the octopus. The homework fairy is handing out in front on the left.
6. Use the chat and call them by name.
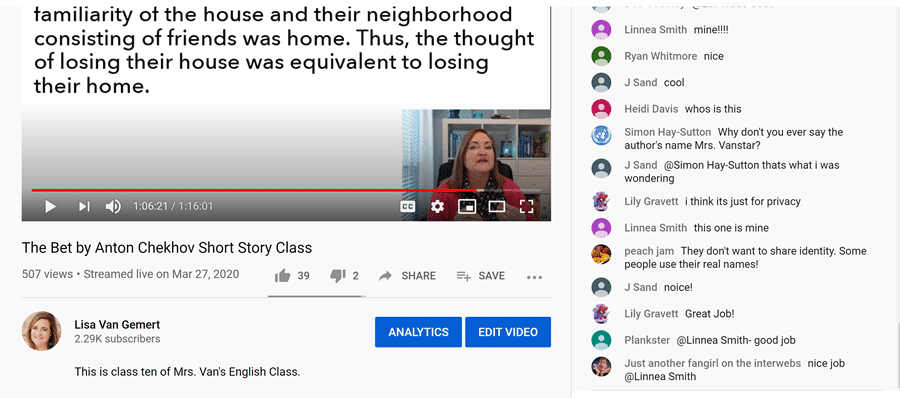
When I am in a live online class (meaning students are in there with me, not just viewing a video I made later), I leverage the chat feature.
If you’re not allowed to use chat, then stay tuned for the way I’d handle that.
In this screenshot, you can see the question I’m asking students. On the right, you can see their responses to a previous question. There’s a little delay in livestreaming, which takes some getting used to.
What I want you to notice is the quality of their answers. The question they’re responding to is if a character in the story should be held accountable for his racist views because he was a product of his times.
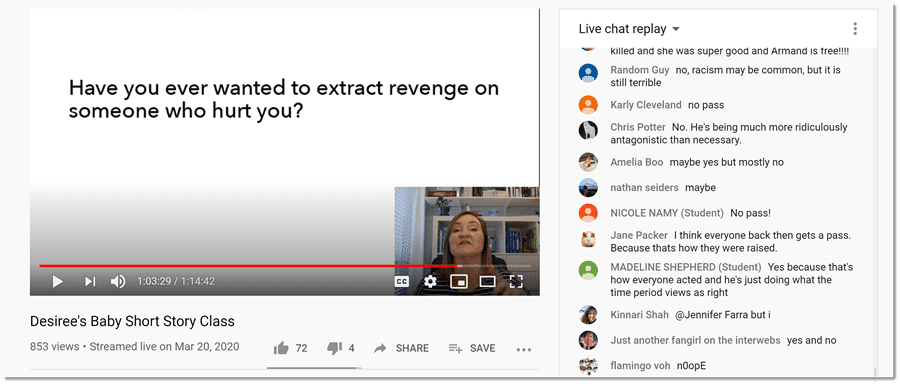
I take their answers and run with them.
Use their answers to ask more questions, push back against their ideas, and give you insight into what really gets them fired up.
If you can’t use chat, you can still use their work to engage in a similar way.
In the example below, I took a comment a student made and highlighted it for all to see.
I’ve found that students love to see their work featured, even little comments like this, and they will make better, stronger comments in order to try to get featured.
It raises the level of discourse overall.
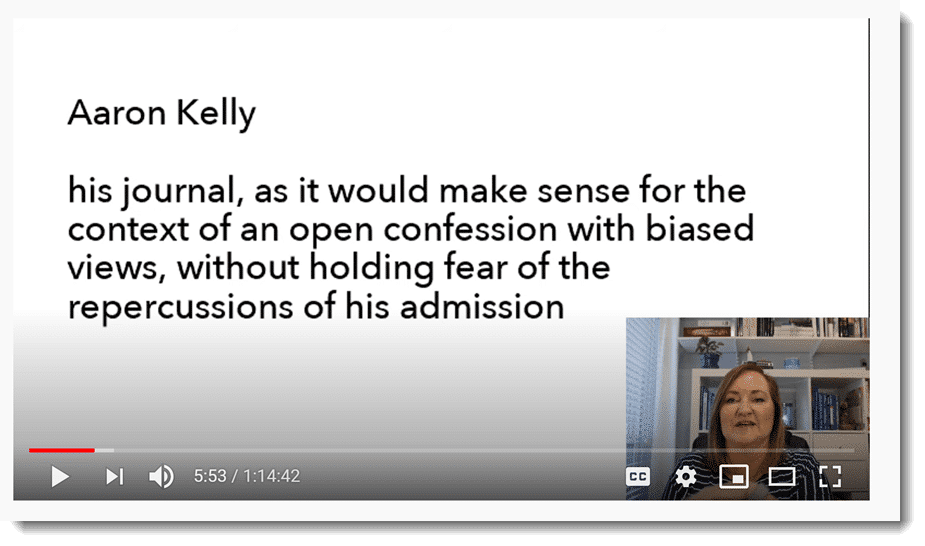
I also highlight students’ formal responses in their writing or other work. I point out what was well done and why it was effective. I also add suggestions for strengthening it.
You can see in the screenshot below how supportive kids are of other students, and that the author voluntarily revealed who she was (I don’t tell, but I let them say if they want to).
Some Tech Tools & Tips
If you’re having students use digital tools in distance learning, I’d strongly suggest using tools you’re already used to.
We don’t want to pile too many new things on our students (or ourselves) all at once.
While you can send students to lots of different tools that work well in distance learning environments, there are a few that work really well that I’d like to share.
1. Canva Whiteboard
I used to absolutely adore Jamboard (RIP), but since Google took it away, I was happy when Canva emailed me and said, “Hey, Lisa, did you know that we have a super cool whiteboard tool for teachers?”
You can check out Canva’s whiteboard tool here.
You can make whiteboards that you can write on, add pictures to directly from Google or those you upload, you can add sticky notes, and you can add extra frames to it, so your white board can be many white boards.
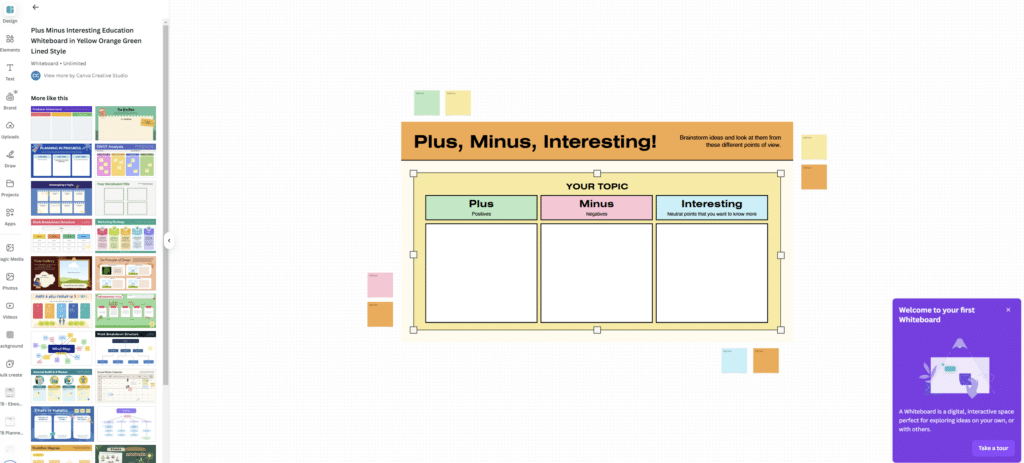
What’s super cool about the Canva whiteboard tool is that there are SO MANY design options already done for you (you can see them over there on the left).
Be sure to get Canva’s educator account while you’re there.
2. Menti
Menti is a free audience response system.
There’s a paid version, but you don’t need it.
I love Menti all of the time, but it’s really useful for engagement in digital environments.
I can ask students what questions caused them problems.
I can get their feedback.
You can create polls and scales and open ended questions and word clouds.
Here’s the problem with using it in distance learning – they need a second device or the ability to open another tab. You’ll know if your group can handle that.
I used Menti to ask teachers what the best thing about distance learning is, and you can see how it looked when the responses came in in this image below:
3. Paper and pen
Remember that paper and pens are tech tools.
You can write on paper or white boards and hold them up to your camera. This is allowed!
Don’t let the tech side overwhelm the teaching side.
Even in distance learning, tech is a tool, not pedagogy.
Blend tech and analog for best results.
Even if you’re recording it for them to watch later, be sure to have things they need to stop the recording to do.
4. Change it up
If you are just showing slides, have a goal to have those slides changing (or something changing on the slides) really frequently.
If your face is there too, you are the animation, so it doesn’t need to change as quickly.
If it’s just slides, friends, you need to be changing those every 7 – 10 seconds.
One way to do that is to use animations to add elements or simply put each idea on its own slide.
No bullet points! I’ve got a little playlist on YouTube that has PowerPoint tips, and there are loads of great tutorials out there for good presentation design.
Watch a few, especially on animations.
I got great benefit from taking a PowerPoint class on Udemy for less than ten bucks that really helped me go through it methodically.
Here’s the key to great slides: have something worth looking at.
Even if they’re just looking at documents or slides, put notes in text boxes to the side of them, like this example below:
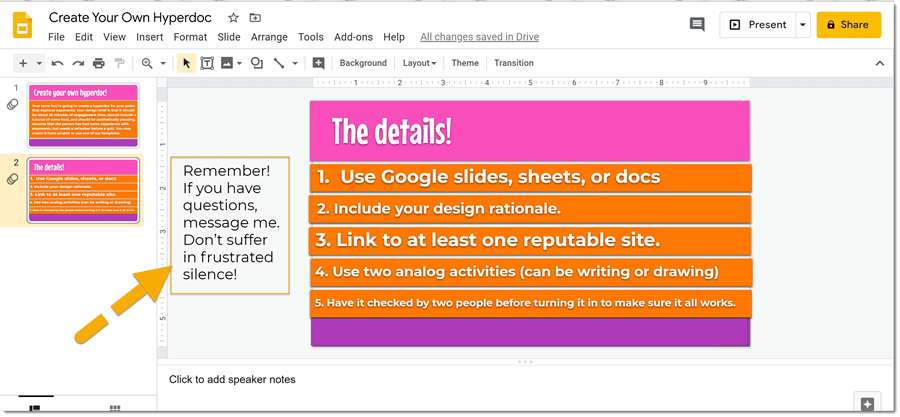
The yellow arrow is pointing towards the text box I added to the side with extra information.
You can do this on slides, and they won’t show when presented.
5. Make your own tutorials
If they’re going to be using unfamiliar tech, my strong suggestion is to make your own tutorial on how to use it.
Go watch others, sure, but create your own using any of the screencasting tools I’m going to discuss in a minute.
Why create your own tutorials? There are three main reasons:
- Your students are used to learning from you. They know your style.
- You know your students. You know the kinds of things that will trip them up. You can anticipate the issues and go over those areas more carefully and slowly.
- When you creat a tutorial, you get to know the tool better yourself.
What I’ve done to get kids begging to have class on the weekend (!)
I get it. You might not actually want to have class on the weekend. The goal is to get students wanting a class that never ends.
The key is to create community. They need to feel like they’re inside something special and unique. Here’s how I did that.
1. Latch on to inside jokes.
In one of the earliest online classes, a student referred to a character in the story as a “leech of despair.”
That became a thing, and I encouraged that. Every story afterwards, someone refer to a character as a “leech of despair.” If the class were nearly over and there hadn’t been one identified, students would say, “Oh, wait! Who’s the leech of despair?”
2. Pay attention to their comments and leverage them.
A student said I was a rock star.
In reality, I am whatever the antonym of rock star is, and I said that I was in slippers, so I couldn’t be.
One of the students insisted that slippers couldn’t stop me and another student called me Mrs. Vanstar. Believe me, I’m running with that.
I started calling the kids the vanstars. Now, they’re a group, they’re a team.
When I refer to them, I don’t say, “Class”. I say “Vanstars”.

3. Grab inside jokes from outside of class.
We read Ray Bradbury’s “All Summer in a Day” and I tweeted out about it.
Someone replied to my tweet with the hashtag #justiceformargot, a character in the story. I shared that with the students, and they took it over and ran with it.
Even among the students, they kept using the inside jokes.
They even made a hashtag for them. Here’s an example:
@Cloudfall2260 I’m eating bluberries i should put some in muffins. (hehe #Mrs.Vanstarsinsidejokes)
4. Let them push back.
I encourage students to push back against me.
Let’s be honest: It’s not a community if it’s led by a dictator.
I will change my mind if they persuade me, and I will say, “50 points to Griffindor!” if a student changes my mind.
5. Create an inside group
I call mine “the Mastermind”.
Get a few kids who you can bring on over to the dark side.
Give them a special invitation (it works best when it’s invitation only) and meet with them outside of the regular class as a group.
Bounce ideas off of them, let them vote on ideas. They will then prosyletize your ideas to others.
6. Give them backstory and trivia.
Look up random images and quotes.
Do a little research.
We all love to feel that we know some esoteric piece of knowledge. We get a little dopamine ping!
So spend a few minutes looking stuff up. For example, we were reading “Desiree’s Baby” by Kate Chopin, and we had previously read Guy de Maupassant’s “The Necklace.” I found a quote where Chopin talked about Maupassant, and that connection, that backstory, was intriguing.
I decided to try it for an example, so I searched Google for a random 2nd grade topic of study in social studies.
One of the standards in my state is that students identify selected symbols such as state and national birds and flowers and patriotic symbols such as the U.S. flag and Uncle Sam.
I then went and searched weirdest state bird. I found some interesting things.
So I would grab some pictures and then ask, “The California gull is the state bird of a state that’s not California! Let’s guess which one!”
I’d also show some pictures of birds and let them guess which one is our state bird.
I want to create curiosity.
As a teacher, I am a purveyor of curiosity.
This took three minutes. You have time. Take it.
7. Plant Easter Eggs in work.
Every now and then, have references to something that are somewhat hidden in the work.
For example, there’s a Starbucks cup in every scene in the movie Fight Club.
In Dark Knight, Heath Ledger’s character was dressed as a nurse. The uniform on his badge said, “Matilda,” which is the name of Heath Ledger’s daughter in real life.
Just go search Google for easter eggs in movies, and you’ll get ideas.
8. Tech can’t trump pedagogy
This seems obvious, but no ideas will work if the content itself is boring or repetitive.
Then you’re just rearranging chairs on the Titanic.
Tech will not save you. It will drown you if your pedagogy is lacking.
Focus on great pedagogy and the tech follow, rather than lead.
Video tools and tips
In addition to using platforms like Zoom or others, you can record a video or screencast that students view later.
This video can be uploaded into a learner management system or put up on YouTube or Vimeo or other video hosting sites if you don’t have an LMS like Canvas.
If you’re facilitating a class, I will say that using any platform with big groups is problematic.
It’s not that the platform can’t handle it, it’s that it’s impossible to do a good job engaging everyone and monitoring that engagement.
Ideally, you’d have ten or fewer, so I’d suggest doing two separate groups or working with another teacher.
This is one of those “stitch in time” things that will save you time and headaches in the long run.
Wrapping Up:
In the end, engaging students in distance learning is very similar to engaging them in person.
You need to care about them, and you need to let that show.
You need to invest the time it takes to master the craft.
You need to anticipate and plan for possible problems.
You need to practice.
Be patient with yourself, trying one idea at a time. Keep the ones that work for you, and discard the ones that don’t.
You can do it, and your teaching toolbox will grow as you do.
Good luck!
You May Also Like:
- How I Became the Country’s English Teacher Overnight
- Learning at Home Resources for Parents and Teachers
- If you’d like to join the thousands of other people who like getting my emails, you can sign up here.